How to Roll Roti Evenly: Foolproof Guide for Soft, Round Chapatis
 Sep, 18 2025
You want roti that’s round, thin, and cooks evenly without hard patches or burnt spots. The trick isn’t brute force or a fancy rolling pin-it’s consistent dough, controlled pressure, and a rhythm you can repeat. I learned this the hard way in a tiny Sydney kitchen with a too-hot tawa and supermarket wholemeal flour. Once the dough and pressure clicked, the rotis started puffing like little balloons.
If you’re wondering how to roll roti evenly, this guide gives you the exact formula-hydration targets, pressure cues, and tiny hand movements that change everything. Expect a bit of practice. But you’ll feel it come together in a session or two.
TL;DR: The Even Roti Formula
Here’s the quick path to even, round rotis you can repeat without guessing. After reading this, you should be able to:
- Pick the right flour and hydration so the dough rolls without cracking or sticking.
- Shape smooth dough balls (pedas) that roll into circles, not ovals.
- Use the center-out rolling pattern with light, even pressure.
- Rotate the dough often so it stays round and the thickness stays uniform.
- Cook at the right heat so the roti sets before it dries out.
Quick hits:
- Flour: Use chakki atta (stoneground whole wheat). In Australia, most Indian grocers stock it. Supermarket wholemeal works if you add 10% plain flour and 1 tsp oil per cup.
- Hydration: 60-65% water by weight (e.g., 300 g flour → 180-195 g water). Warm water helps.
- Knead: 5-8 minutes till smooth; rest 20-30 minutes covered.
- Ball size: 30-35 g for everyday chapati (~16-18 cm), 40-45 g for bigger rotis (~20-22 cm).
- Dusting: Light-just enough to prevent sticking. Shake off excess before the tawa.
- Rolling pattern: Two strokes north-south, quarter-turn, repeat. Lighter pressure at the edges.
- Heat: Medium-high tawa (around 230°C surface). 20-30 sec first side, 20-30 sec second, then puff.
Step-by-Step: From Dough to Tawa
Follow this once, and you’ll know exactly where your rotis are going wrong (if they do).
-
Choose the right flour. For classic chapati, use chakki atta. It absorbs water well and rolls thin without tearing. If you only have Aussie supermarket wholemeal, mix 90% wholemeal with 10% plain flour and add a teaspoon of neutral oil per cup. It softens the dough and reduces cracking.
-
Measure hydration. Aim for 60-65% water by weight. For 2 cups atta (about 260-300 g, depending on brand), you’ll usually need 160-195 g of water. Start at the lower end; add a teaspoon at a time until the dough comes together.
-
Mix and knead. Combine flour and water. Knead 5-8 minutes until smooth and slightly springy-not sticky, not dry. If the dough cracks when you press it, add a sprinkle of water and knead 1-2 minutes. If it sticks to your hands, dust with a spoon of flour and knead to absorb.
-
Rest the dough. Cover and let it rest 20-30 minutes. This relaxes gluten and evens out moisture. If your kitchen is dry (Sydney winter), light oil on the dough ball stops skinning. In humid weather, a damp towel is enough.
-
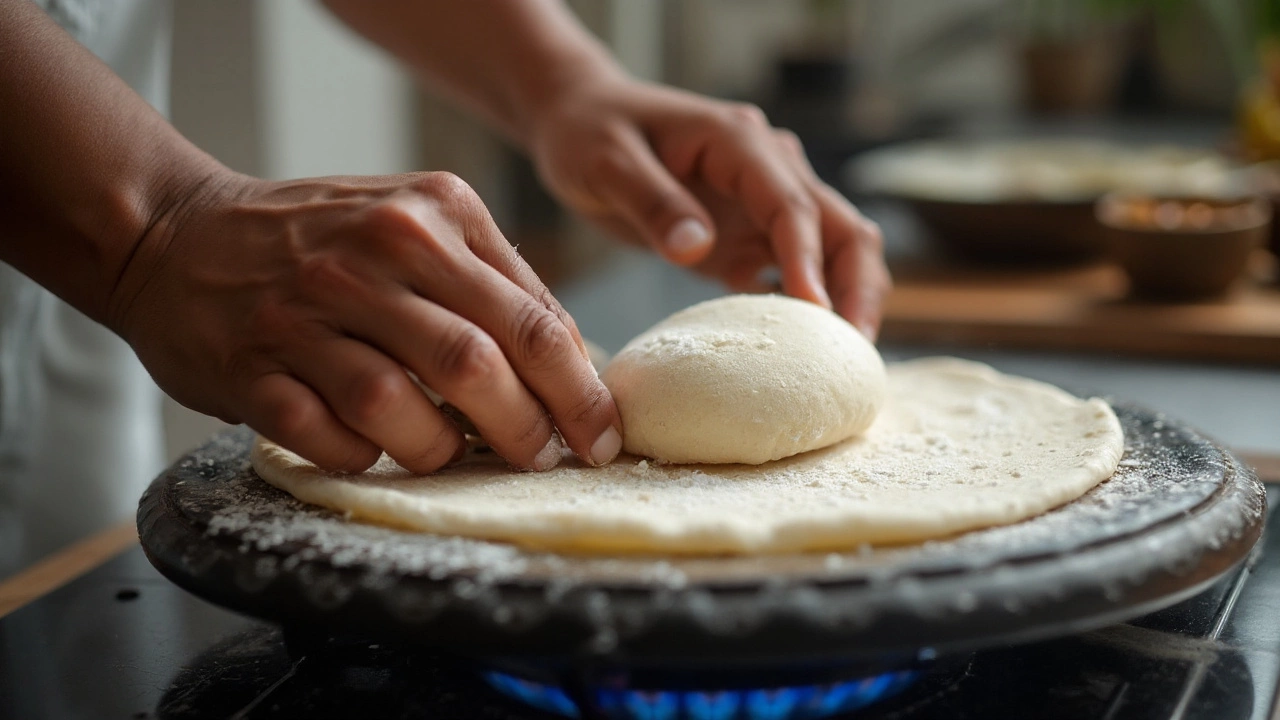
Portion and pre-shape. Divide into 30-35 g pieces. Roll each into a tight ball: cup your hand, press and roll on the counter to create a smooth surface. That smooth skin matters-it turns into a smooth roti surface.
-
Flatten and dust. Press each ball into a puck, dip both sides lightly in dry flour, then shake off excess. Too much dusting flour burns on the tawa and dries the roti.
-
Set up your board and pin. Use a smooth board (chakla) and a light rolling pin (belan). Non-stick boards can be slippery; wooden boards give better control. Keep a small bowl of dusting flour nearby.
-
Start rolling: center-out strokes. Begin with gentle strokes from the center to the edge, then lift the pin. Don’t roll back-and-forth over the same path; that stretches and contracts the dough unevenly.
-
Rotate often. After two strokes, lift the disc, rotate a quarter turn (or turn the board), and repeat. This rotation keeps the circle shape and spreads thickness evenly. Think: roll-roll-turn.
-
Control pressure like a dimmer, not a switch. Heavier pressure in the first few strokes, then lighter as the disc grows. At 10-12 cm wide, lighten even more so you don’t thin the edges too much. You’re smoothing, not squashing.
-
Use your non-dominant hand. Place your free hand near the edge to guide shape and feel thickness. Your rolling hand presses; your other hand rotates and steadies. If one side looks thicker, roll just that quadrant once, then resume the roll-turn rhythm.
-
Check the thickness. Aim for 1.5-2 mm (about the thickness of a credit card and a half). Hold it to the light-the center and edges should look equally translucent. If edges are much thinner, your pressure is drifting outward too early.
-
Dust sparingly as needed. If it sticks, lift, dust the board lightly, and continue. Don’t bury the dough in flour. A tiny brush or a quick clap removes excess dusting flour before the tawa.
-
Heat the tawa right. Medium-high. If you flick water, it should sizzle and vanish in about 2 seconds. Too hot and the roti blisters before it cooks inside; too cool and it dries out.
-
Cook with timing. Place the roti onto the hot tawa. When you see small bubbles (20-30 sec), flip. After 20-30 sec on the second side, press edges lightly with a cloth or tongs or move it directly to flame (if using gas) to puff. Remove once fully inflated or the surface has uniform brown spots.
-
Keep soft. Stack cooked rotis in a covered container or a cloth-lined roti basket to trap steam. If serving later, brush with ghee and wrap.
What if you’re stuck with plain flour? You can make soft, even rotis with all-purpose (maida), but they’ll be more like roomali roti-very soft, less nutty. Hydration 58-62%, rest 30 minutes, and keep the tawa heat slightly lower to avoid blistering.
Cheat Sheets, Heuristics and Pitfalls
These are the little rules that stop 90% of issues before they start.
- Heuristic: Dough tells you pressure. If your dough resists the pin, rest it 5 more minutes. If it collapses too easily and sticks, it’s over-hydrated-dust lightly or knead in a teaspoon of flour.
- Heuristic: Rotate every two strokes. This keeps it circular, evens thickness, and prevents ovals.
- Heuristic: Center 55%, edge 45%. Put slightly more pressure in the center early on; shift to even pressure once it’s 12 cm across.
- Heuristic: Light dust, heavy shake-off. Dusting flour should never leave a visible coating. Clap the roti between your palms to knock off the extra before cooking.
- Heuristic: Don’t chase perfect roundness at first. Chase even thickness. Roundness follows once your turn rhythm is consistent.
Common pitfalls and quick fixes:
- Oval rotis: You’re rolling more in one direction than others. Reset by rotating a quarter turn after every two strokes. Roll once on the longer axis only, then resume your rhythm.
- Edges fraying or cracking: Dough too dry. Knead a teaspoon of water into the next peda or brush a touch of water around the edge and let it sit 2 minutes before rolling.
- Center thick, edges thin: You’re pressing too much at the outer third late in the roll. Start your stroke a touch inside the center and end just before the rim; don’t roll off the edge.
- Sticking to the board: Under-dusted or dough over-wet. Lift, dust the board lightly, and rotate more often. In humid Sydney summers, keep a fan on the bench-it keeps the surface dry.
- Dry flour burning on the tawa: Too much dusting flour. Clap the roti before cooking, or use a sieve to sprinkle a barely-there dust.
- No puff: Slightly uneven thickness or low heat. Press gently along the edges after the second flip to encourage steam to travel. If using an electric cooktop, preheat longer; they run cooler at the surface.
- Tough rotis: Overcooked or under-hydrated dough. Increase hydration by 2-3% next time, and shorten cook time by 5-10 seconds per side.
Targets that make practice easy:
| Target | Metric | Why it matters |
|---|---|---|
| Dough hydration | 60-65% (by weight) | High enough to roll thin; low enough to avoid sticking and tears. |
| Rest time | 20-30 min (covered) | Gluten relaxes; dough rolls without spring-back. |
| Peda weight | 30-35 g (chapati), 40-45 g (large roti) | Predictable size and thickness every time. |
| Rolled diameter | 16-18 cm (chapati), 20-22 cm (large) | Uniform cooking and easy handling. |
| Thickness | 1.5-2 mm | Even heat penetration, good puff. |
| Tawa surface temp | ~230°C | Sets starch quickly without scorching. |
| Cook time | 20-30 s each side + puff | Prevents drying and toughness. |
| Dusting flour | ~1-2 tsp per roti | Prevents sticking without burning. |
| Roll-turn rhythm | 2 strokes → 1 quarter turn | Keeps circle shape; spreads thickness evenly. |
Practice drills (5 minutes, low mess):
- Coin drill: Place a coin at the center. Your first two strokes should stop 1 cm before the rim, not smack the edge. Remove the coin and keep going.
- Quadrant drill: Lightly mark a cross on the dough with your pin. Roll each quadrant once per cycle to keep thickness even.
- Paper test: Aim for a roti that slides under a sheet of printer paper without snagging; that’s roughly 2 mm.
FAQ and Troubleshooting
Quick answers to what usually pops up once you start rolling.
-
My roti always goes oval. What am I doing wrong?
You’re probably doing more strokes in one direction. Lock in a two-strokes-then-turn rhythm. If it’s already oval, roll once on the long axis only, then go back to roll-turn. -
The edges crack even after resting.
The dough’s a touch dry. Wet your fingers, brush around the rim, wait 2 minutes, then roll. Next batch, increase hydration by 2-3% or add 1 tsp oil per cup of flour. -
It sticks to the board no matter what.
Dust the board lightly, not the dough. Lift and rotate more often so no spot glues itself down. In humid weather, chill the dough 10 minutes before rolling; it firms and releases easier. -
No puff-ever.
Even thickness is half the story; heat is the other. Preheat the tawa longer. After the second flip, press the edges gently to push steam toward the center. If you’re on electric, you may need 5-10 seconds more per side. -
My rotis are round but not even-some bites chewy, some soft.
That’s uneven thickness. When you hold a rolled roti up to the light, it should look equally translucent all around. Add a rotation after every two strokes, and don’t roll off the edge. -
Can I use a tortilla press?
For chapati-style rotis, a press can help with roundness but often gives uneven thickness and compressed edges. If you use one, press lightly, then finish with 2-3 center-out strokes and rotations with a pin. -
Is oil or ghee in the dough okay?
A small amount (1-2 tsp per cup) makes the dough more forgiving and keeps rotis soft. Too much and they won’t puff well. For paratha, yes; for chapati, keep it minimal. -
What about gluten-free?
100% gluten-free rotis (e.g., jowar/bajra) are hand-patted, not rolled thin with a pin, and need a different method. For even rolling, include some tapioca or xanthan for elasticity, or use half atta and half GF flour if your diet allows. -
Storage tips for softness?
Keep stacked in a covered container. Reheat on a hot tawa for 10-15 seconds each side, or 10 seconds in the microwave under a damp towel. -
Flour choices in Australia?
Look for chakki atta at Indian grocers. If using supermarket wholemeal, blend with 10% plain flour and bump hydration slightly; Aussie wholemeal can be a touch coarser.
Scenario-based fixes:
- Beginner with only plain flour: Hydration 58-62%, rest 30 minutes, dust very lightly, and roll smaller rotis (14-16 cm) till your pressure control improves.
- High humidity day: Keep dusting flour in the fridge so it stays dry. Shorten dough rest by 5 minutes to avoid extra softness and sticking.
- Cold winter kitchen: Use warm water and extend rest to 30-40 minutes. Preheat tawa longer; cold pans cause sticking and stiffness.
- No rolling pin: Use a clean wine bottle, very light pressure, same roll-turn rhythm. Finish edges with your fingers to keep them even.
- Batch cooking for the week: Slightly undercook (10-15% less). Cool, stack, and freeze with baking paper between. Reheat on a hot tawa to finish; they’ll come out soft.
Next steps if you want this locked in fast:
- Day 1: Make 6 rotis. Focus only on dough feel and rest. Don’t worry about shape.
- Day 2: Make 6 rotis. Lock the roll-turn rhythm. Count strokes aloud: “one, two, turn.”
- Day 3: Add the coin or quadrant drill for 5 minutes, then roll 6 rotis. Check thickness against a credit card stack.
- Day 4-5: Increase to 8-10 rotis. Aim for 90% roundness and even browning.
- Day 6-7: Try larger size (20-22 cm). Keep timing and heat steady.
One last sanity check before you start: if your dough feels like soft Play-Doh, your board is barely dusted, and your strokes are gentle with frequent turns, you’re set. The rest is just a groove your hands will learn.
