The Secret to Fluffy Roti: Mastering the Art of Soft, Puffy Indian Bread
 Jun, 30 2026
Perfect Roti Troubleshooter & Calculator
Hydration Calculator
Based on the ideal 60-65% hydration rule for soft rotis.
Your Recipe Ratio
Enter flour amount to see water recommendation.
What went wrong?
Diagnosis & Solution
Select a problem from the left to see how to fix it based on the article's physics and technique guide.
Have you ever pulled a roti from the pan only for it to turn out hard as a rock or flat as a pancake? It’s frustrating. You’ve followed the recipe, you’ve kneaded the dough, but that magical puff-the one that makes your mouth water-just isn’t there. The secret to **fluffy roti** isn’t magic; it’s physics and patience. It comes down to three non-negotiable factors: gluten development, moisture retention, and steam pressure.
If you want rotis that are soft enough to fold over without cracking and puffy enough to hold a dollop of ghee, you need to rethink how you handle the dough. Most home cooks make the same few mistakes every time. Let’s break down exactly what goes wrong and how to fix it, step by step.
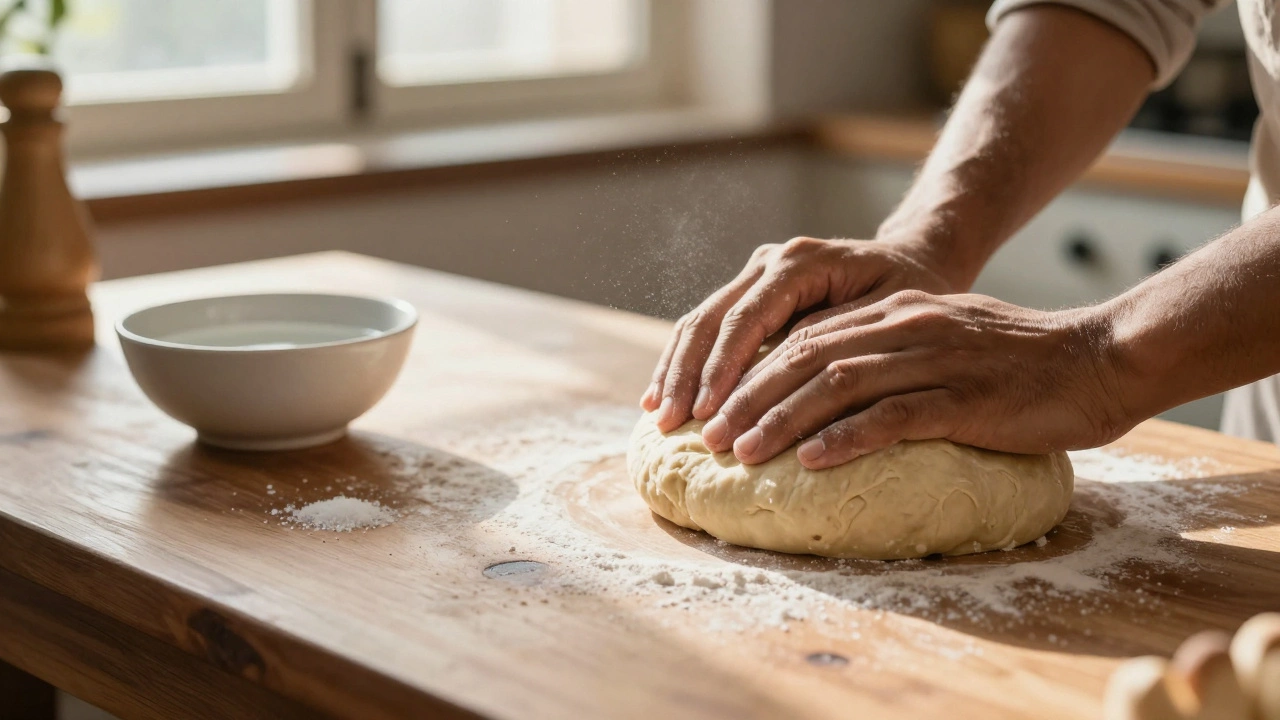
The Dough Foundation: Hydration is Key
Everything starts with the flour-to-water ratio. Many recipes tell you to add "water as needed," which is vague and dangerous if you’re aiming for consistency. Whole wheat flour (atta) absorbs water differently than refined flour (maida). If your dough is too dry, the gluten strands won’t form properly, leading to dense, tough rotis. If it’s too wet, the roti will stick to the pan and tear.
Whole Wheat Flour (Atta) is the primary ingredient in traditional Indian roti, known for its high fiber content and distinct nutty flavor. Unlike refined white flour, atta retains the bran and germ, which affects hydration needs. For best results, use fresh, finely milled atta. Coarse flour requires more water and longer resting times.
Aim for a dough that feels like your earlobe-soft, pliable, and slightly tacky but not sticky. A good rule of thumb is about 60-65% hydration. This means for every 1 cup of flour, you need roughly 3/4 cup of water. However, humidity plays a role. In Sydney, where I live, the air can be humid, meaning you might need less water than someone in a dry climate. Adjust gradually. Add water one tablespoon at a time until you hit that sweet spot.
Kneading: Building the Gluten Network
You might think kneading is just about mixing ingredients, but it’s actually about building structure. When you knead, you align the gluten proteins in the flour. These proteins form a mesh that traps gas bubbles during cooking. Without this mesh, the roti won’t puff up because there’s nothing to hold the steam inside.
- Time matters: Knead for at least 8-10 minutes. Yes, it sounds like a lot, but it’s worth it. Shortcuts here lead to tough bread later.
- Use your palms: Push the dough away from you with the heel of your hand, then fold it back. Repeat this rhythmically.
- Add fat: Incorporate 1-2 tablespoons of oil or ghee into the dough. This lubricates the gluten strands, keeping the roti soft even after it cools.
If you skip the kneading or rush it, the gluten network remains weak. The result? A roti that cracks when you fold it or turns into leather within minutes. Proper kneading ensures elasticity. You should be able to stretch the dough ball slightly without it snapping back aggressively or tearing.
The Resting Phase: Why Patience Pays Off
This is the step most people ignore. After kneading, cover the dough with a damp cloth or plastic wrap and let it rest for at least 30 minutes. Ideally, an hour. During this time, two things happen:
- Hydration equalizes: The flour fully absorbs the water, eliminating dry patches.
- Gluten relaxes: Kneading tightens the gluten. Resting allows it to loosen up, making the dough easier to roll out without shrinking back.
Skipping the rest means fighting the dough. You’ll end up rolling it thinner to compensate for its resistance, which leads to burnt spots or uneven cooking. Give the dough time to settle. If you’re short on time, refrigerate it for 2 hours-it actually improves the texture by slowing down fermentation processes slightly, resulting in a more tender crumb.
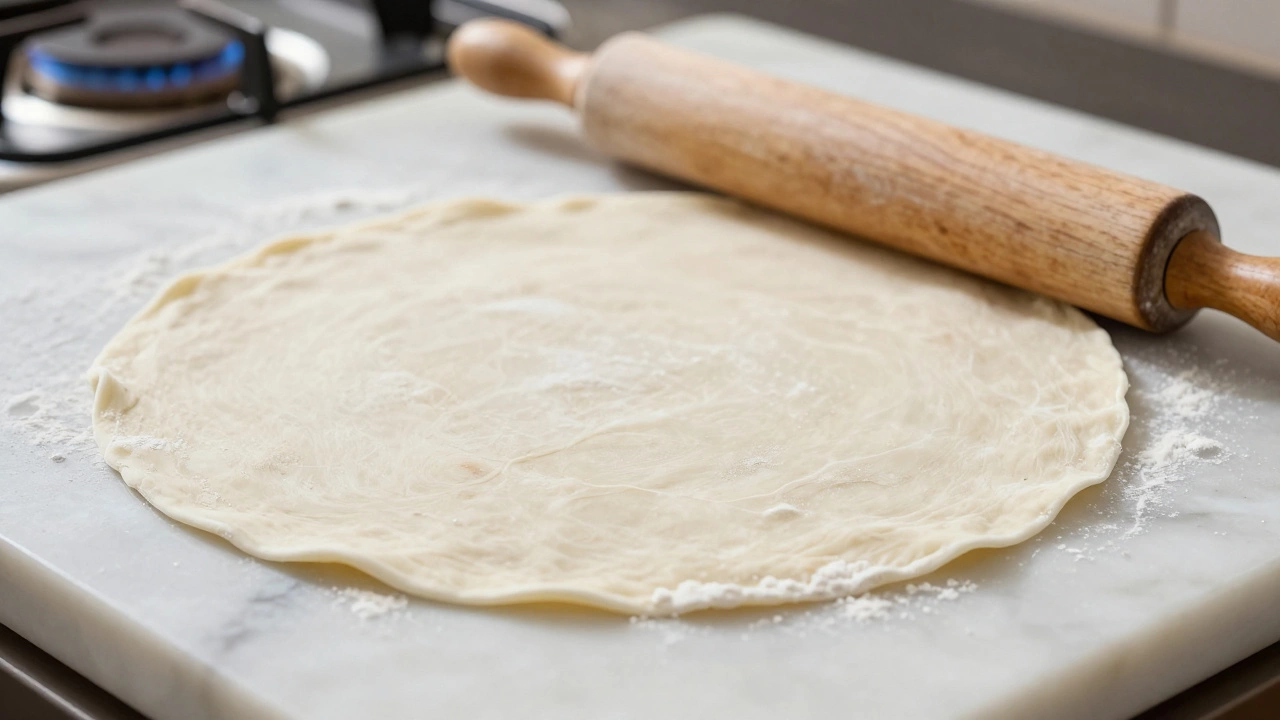
Rolling Technique: Uniformity Creates Steam
How you roll the roti determines how evenly it cooks. Uneven thickness means some parts burn while others stay raw. More importantly, uniform thickness helps create consistent steam pockets.
Start by dividing the rested dough into small, equal-sized balls. Lightly dust your rolling surface with dry flour, but don’t go overboard. Too much dry flour creates a barrier between the layers of the roti, preventing them from sticking together and puffing up.
| Mistake | Consequence | Best Practice |
|---|---|---|
| Using too much dry flour | Layers separate, no puff | Dust lightly; use water on hands if sticky |
| Rolling unevenly | Burnt edges, raw center | Rotate frequently; aim for consistent thickness |
| Pressing too hard | Squeezes out air pockets | Use gentle, steady pressure |
Roll from the center outward, rotating the dough 90 degrees after each pass. This keeps the shape round and the thickness even. Aim for a diameter of about 6-7 inches. Thinner rotis cook faster but are less likely to puff. Thicker ones take longer but have more potential for a dramatic rise. Find your balance.
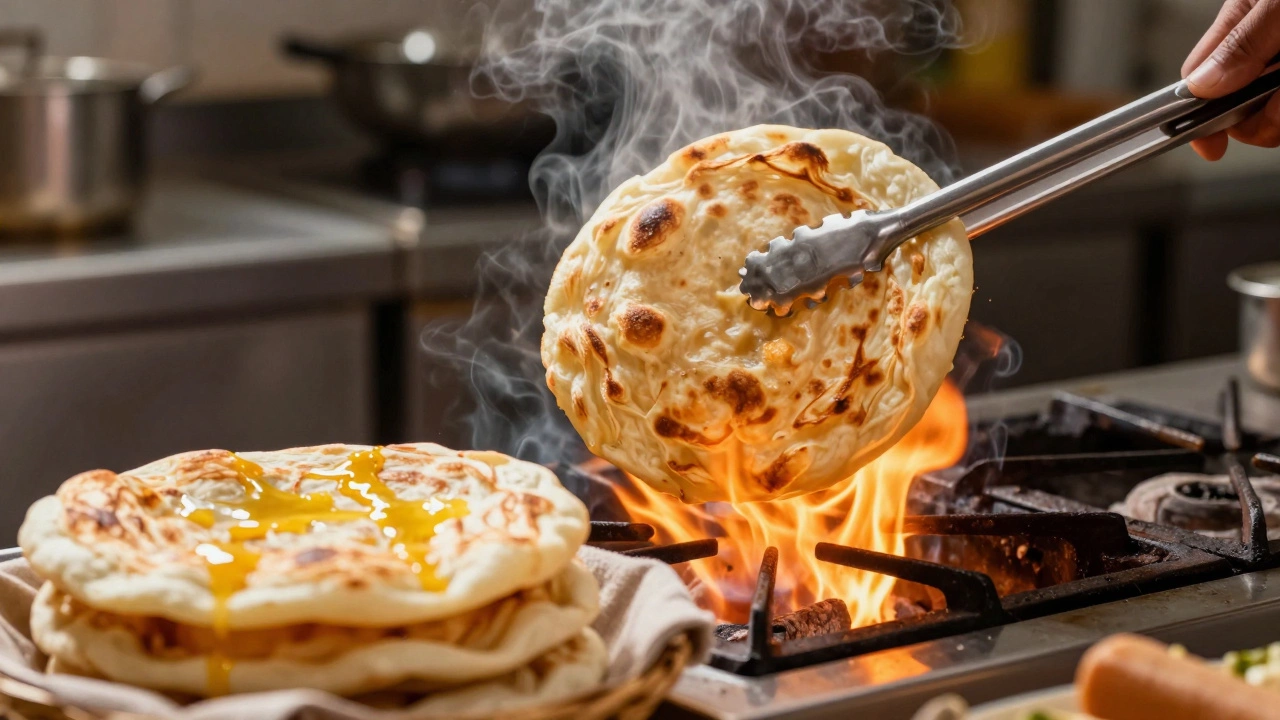
Cooking: Heat Control and Timing
Now comes the performance. The heat source is critical. A medium-high flame is ideal. If the pan is too cool, the roti dries out before it puffs. If it’s too hot, the outside burns before the inside cooks.
Place the rolled roti on a preheated tawa (flat griddle). Cook for about 30 seconds until you see small bubbles forming on the surface. Flip it. Now, cook the second side for another 30 seconds. Look for brown spots appearing. This indicates the Maillard reaction is happening, adding flavor and color.
Here’s the trick: Press the center gently with a clean kitchen towel or spatula. This encourages air to get trapped inside. Then, transfer the roti directly onto an open flame using tongs. Move it around constantly. Within seconds, the trapped steam will expand rapidly, causing the roti to puff up like a balloon. Remove it immediately once fully puffed.
Ghee and Storage: Keeping it Soft
Once cooked, brush the hot roti generously with ghee or butter. This seals in moisture and adds richness. Stack the cooked rotis in a cloth-lined basket. The residual heat and steam will keep them soft for up to an hour. If you need to store them longer, wrap them tightly in aluminum foil or place them in an airtight container while still warm. Reheat them on a dry pan for 10 seconds per side to restore freshness.
Avoid storing rotis in the refrigerator unless necessary. Cold temperatures accelerate starch retrogradation, turning them stale and hard quickly. If you must freeze them, separate each roti with parchment paper and thaw at room temperature before reheating.
Troubleshooting Common Issues
Even with perfect technique, things can go wrong. Here’s how to diagnose common problems:
- Hard Roti: Likely caused by under-kneading, insufficient resting, or overcooking. Next time, knead longer and remove from heat sooner.
- No Puff: Check your rolling technique. Did you use too much dry flour? Was the dough too thick? Ensure the pan is hot enough to generate immediate steam.
- Cracking When Folded: The dough was probably too dry or not rested enough. Increase hydration and extend resting time.
- Bitter Taste: You burned the roti. Lower the flame and watch closely. Brown spots are good; black spots are bad.
Remember, practice makes perfect. Your first batch might not be flawless, but with attention to detail, you’ll master the art of fluffy roti. It’s not just about feeding hunger; it’s about creating a comforting, homemade experience that brings people together.
Why does my roti become hard after cooling?
Rotis harden due to moisture loss and starch retrogradation. To prevent this, ensure your dough has enough fat (oil/ghee), cook them properly so they aren't dried out, and store them in an airtight container while still warm. Brushing with ghee after cooking also helps retain softness.
Can I use all-purpose flour instead of whole wheat for roti?
Yes, you can use all-purpose flour (maida) for softer, chewier rotis similar to naan. However, traditional roti uses whole wheat flour (atta) for its nutritional value and texture. Maida rotis require less water and less kneading time since gluten develops faster.
How long should I let the dough rest?
Ideally, let the dough rest for at least 30 minutes to an hour. This allows the flour to fully hydrate and the gluten to relax, making it easier to roll and resulting in softer rotis. Rushing this step often leads to tough, elastic dough that shrinks back when rolled.
Why doesn't my roti puff up on the flame?
Puffing requires trapped steam. If your roti doesn't puff, check if you used too much dry flour while rolling (which separates layers), if the dough was too thick, or if the pan wasn't hot enough to create initial bubbles. Also, pressing the center gently before placing on the flame helps initiate the puff.
Is it better to cook roti on a gas stove or induction?
Gas stoves are generally preferred for making roti because you can easily transfer the roti to an open flame for puffing. Induction cooktops heat pans evenly but lack an open flame, making it harder to achieve the classic puffed look unless you use a specialized grill function or finish under a broiler.
